

Introducing TubeTitles.AI
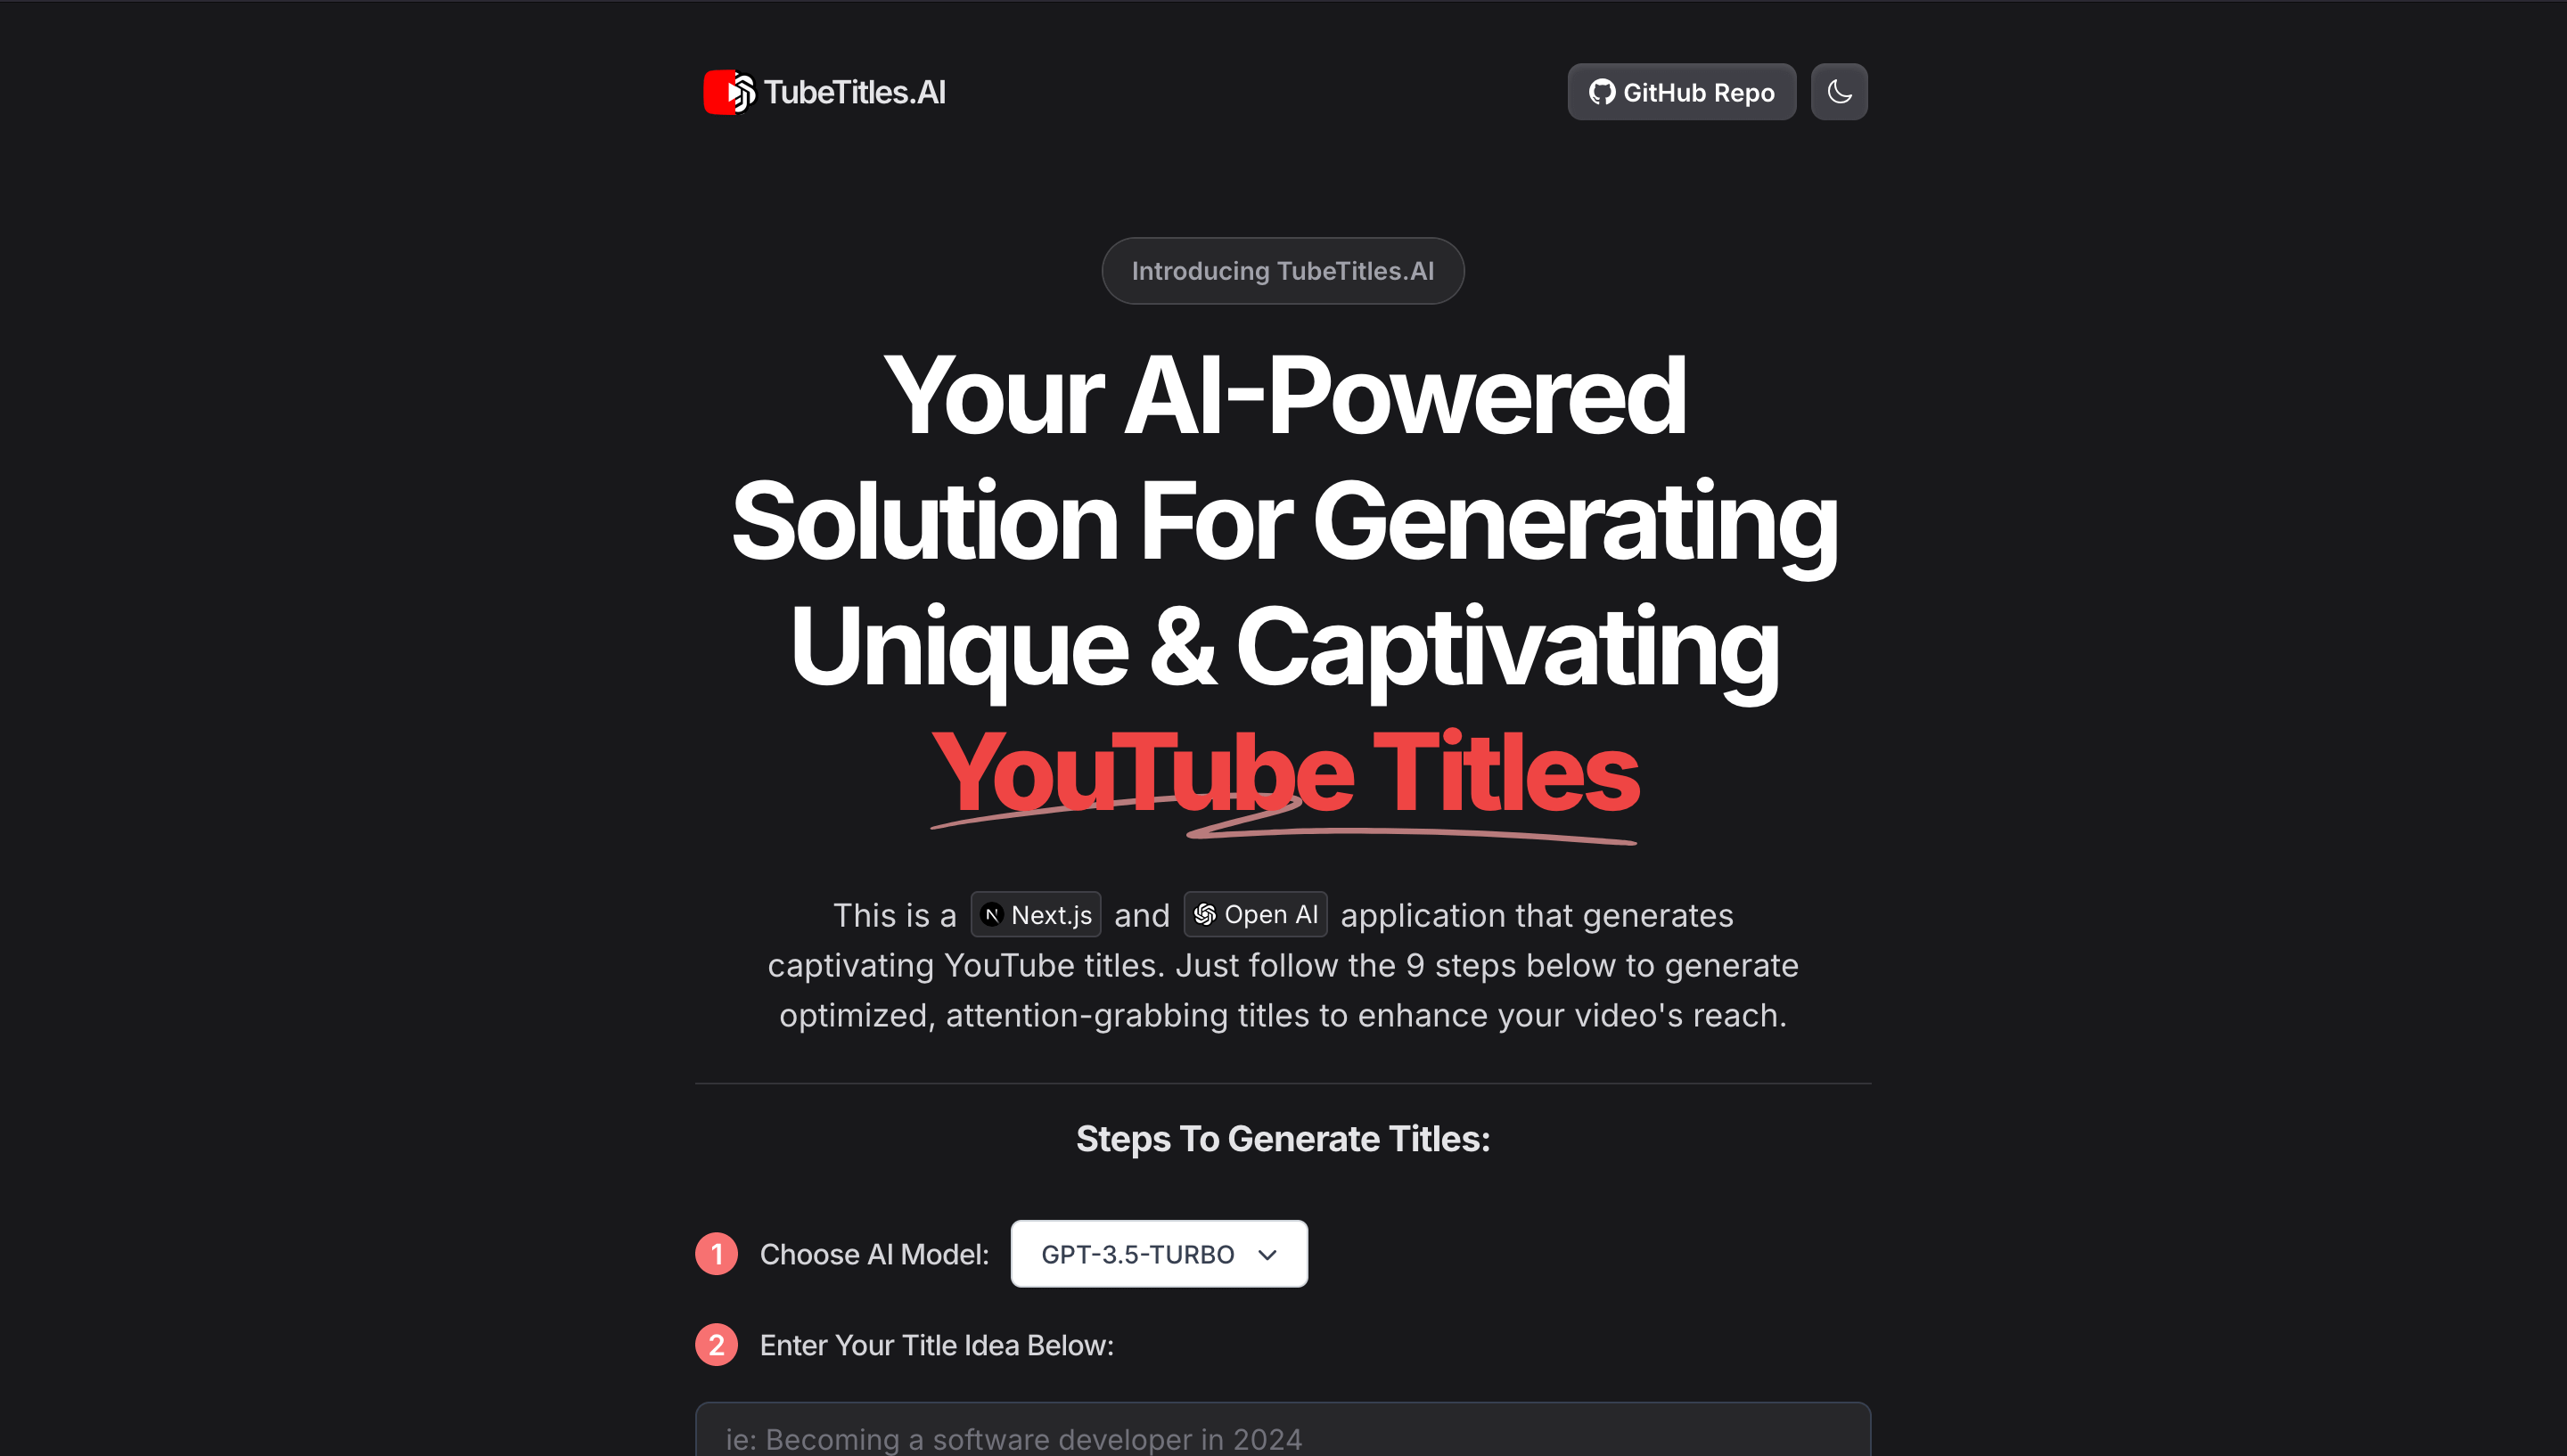
TubeTitles.AI is a Next.js, TypeScript & Tailwind CSS application that uses the OpenAI API to generate captivating YouTube titles. Just follow the 9 steps to generate optimized, attention-grabbing titles to enhance your video's reach.
Live Demo:
https://tube-titles-ai.vercel.app/
Main Features:
- AI Model Selection (OpenAI API).
- User-friendly Interface.
- Customizable Inputs.
- Skeleton Loading Animation.
- Clipboard Functionality.
- Dialog Notification, Buttons & Dropdows from Headless UI
- Next-Themes Light & Dark Modes With Toggle.
Open AI API:
This project requires an OpenAI API key. If you don't already have one, head over to OpenAI and create an API key.
Clone & Run Locally
First, execute create-next-app with npx to bootstrap the example:
npx create-next-app --example https://github.com/JPerez00/ai-youtube-title-generator your-project-name-here
Create a .env.local file in the root directory of your project and add your OpenAI API key:
OPENAI_API_KEY=your-openai-api-key-hereThen run the development server:
npm run devOpen http://localhost:3000 with your browser to see the result.
Clone & Deploy
When deploying the project to Vercel, add the same environment variable to your Vercel project.
Navigate to your Vercel dashboard, select your project, go to the "Settings" tab, and then to "Environment Variables."
Add OPENAI_API_KEY as the key and your OpenAI API key as the value. This ensures the API key is securely accessible both locally and in the deployed environment.
OPENAI_API_KEY=your-openai-api-key-hereSteps To Create This App:
Here's the thought process and steps taken to bring this fun idea to life.
1. Project Initialization:
Create a Next.js 14 project with TypeScript and Tailwind CSS.
npx create-next-app@latest ai-youtube-title-generator --typescript --use-npm
cd ai-youtube-title-generator
2. Creating The Components:
Normally, I would document the home page first, but in this case, the app relies heavily on all the dropdown menus to function properly. Therefore, we need to create the necessary components before building the main page to avoid any crashes due to missing elements.
Dropdown Components Overview:
- ToneDropDown
- CharacterDropDown
- EmojiDropDown
- QuestionDropDown
- MoodDropDown
- LanguageDropDown
- ModelDropDown (for selecting the AI model)
Other Components Overview:
- LoadingDots (for showing loading animations)
- Container (for layout purposes)
The Container.tsx component uses the clsx package:
npm install --save clsxThe other components use Headless UI & Hero icons.
npm install @headlessui/react @heroicons/reactYou can copy and paste all the components from the GitHub Repo
3. Create a .env.local file in the root directory.
OPENAI_API_KEY=your-openai-api-key4. OpenAI API Integration:
Install the required packages:
npm install openai
npm install --save-dev @types/openai
We need to set up the API Routes, create the API route to handle requests to OpenAI and implement the POST endpoint to process user inputs and interact with the OpenAI API.
// app/api/generate-titles/route.ts

import { NextRequest, NextResponse } from 'next/server';
import OpenAI from 'openai';

const openai = new OpenAI({
  apiKey: process.env.OPENAI_API_KEY,
});

export async function POST(req: NextRequest) {
  const { idea, tone, character, emoji, question, mood, language, model } = await req.json();

  if (!idea || !tone || !character || !emoji || !question || !mood || !language || !model) {
    return NextResponse.json({ message: 'All fields are required' }, { status: 400 });
  }

  try {
    const messages = [
      {
        role: "system",
        content: "You're an experienced content writer specializing in creating engaging and optimized YouTube titles."
      },
      {
        role: "user",
        content: `Generate a YouTube title based on the following details:
        - Title idea: ${idea}
        - Tone: ${tone}
        - Character limit: ${character}
        - Emojis: ${emoji}
        - Include a question: ${question}
        - Mood: ${mood}
        - Language: ${language}`
      }
    ];

    const response = await openai.chat.completions.create({
      model: model,
      messages: messages as any,
      max_tokens: 50,
      n: 5,
      temperature: 0.7,
    });

    const titles = response.choices.map((choice: any) => choice.message.content.trim());

    return NextResponse.json({ generatedTitles: titles });
  } catch (error) {
    console.error('Error generating titles:', error);
    return NextResponse.json({ message: 'Internal server error' }, { status: 500 });
  }
}
Below is my current prompt. I tried to be concise and effective with the request, but I'm not entirely sure if it's the best approach. Feel free to modify and improve it.
try {
    const messages = [
      {
        role: "system",
        content: "You're an experienced content writer specializing in creating engaging and optimized YouTube titles."
      },
      {
        role: "user",
        content: `Generate a YouTube title based on the following details:
        - Title idea: ${idea}
        - Tone: ${tone}
        - Character limit: ${character}
        - Emojis: ${emoji}
        - Include a question: ${question}
        - Mood: ${mood}
        - Language: ${language}`
      }
    ];
The API selection is handled by the ModelDropDown.tsx component. I added several models for testing and development, but mainly to gauge the cost of the API requests and keep the project as cheap as possible (the life of a beginner developer, right?).
These are the current options:
- 'gpt-3.5-turbo',
- 'gpt-4-turbo',
- 'gpt-4o',
- 'gpt-4o-mini
It's also nice to be able to switch between different models without having to tinker with the route.ts file.
// app/components/ModelDropDown.tsx

import { Fragment } from 'react';
import { Menu, Transition } from '@headlessui/react';
import { ChevronDownIcon } from '@heroicons/react/20/solid';

function classNames(...classes: string[]) {
  return classes.filter(Boolean).join(' ');
}

interface ModelDropDownProps {
  selectedModel: string;
  setSelectedModel: (model: string) => void;
}

export const ModelDropDown: React.FC<ModelDropDownProps> = ({ selectedModel, setSelectedModel }) => {
  const models = ['gpt-3.5-turbo', 'gpt-4-turbo', 'gpt-4o', 'gpt-4o-mini'];

  return (
    <Menu as="div" className="relative inline-block text-left">
      <div>
        <Menu.Button className="inline-flex justify-center w-full rounded-md border border-gray-300 shadow-sm px-4 py-2 bg-white text-sm font-medium text-gray-700 hover:bg-gray-50 focus:outline-none">
          <span>{selectedModel.toUpperCase()}</span>
          <ChevronDownIcon className="w-5 h-5 ml-2 -mr-1" aria-hidden="true" />
        </Menu.Button>
      </div>

      <Transition
        as={Fragment}
        enter="transition ease-out duration-100"
        enterFrom="transform opacity-0 scale-95"
        enterTo="transform opacity-100 scale-100"
        leave="transition ease-in duration-75"
        leaveFrom="transform opacity-100 scale-100"
        leaveTo="transform opacity-0 scale-95"
      >
        <Menu.Items className="origin-top-right absolute right-0 mt-2 w-56 rounded-md shadow-lg bg-white ring-1 ring-black ring-opacity-5 focus:outline-none">
          <div className="py-1">
            {models.map((model) => (
              <Menu.Item key={model}>
                {({ active }) => (
                  <a
                    href="#"
                    onClick={()=> setSelectedModel(model)}
                    className={classNames(
                      active ? 'bg-gray-100 text-gray-900' : 'text-gray-700',
                      'block px-4 py-2 text-sm'
                    )}
                  >
                    {model.toUpperCase()}
                  </a>
                )}
              </Menu.Item>
            ))}
          </div>
        </Menu.Items>
      </Transition>
    </Menu>
  );
};
5. Building the Home Page:
The main page is designed to be interactive and user-friendly, and now we can:
- Integrate the previously created components into the main page.
- Create the form to capture user inputs.
- Implement the function to call the API route and handle responses.
- Add a skeleton loading animation for better user feedback.
- Implement clipboard functionality to copy generated titles.
- Use the Headless UI Dialog component to notify users when titles are copied to the clipboard.
"use client";
import Image from 'next/image';
import { useState, useRef, useEffect, Fragment } from 'react';
import { Dialog, Transition, Button } from '@headlessui/react';
import ToneDropDown from './components/ToneDropDown';
import CharacterDropDown from './components/CharacterDropDown';
import EmojiDropDown from './components/EmojiDropDown';
import QuestionDropDown from './components/QuestionDropDown';
import MoodDropDown from './components/MoodDropDown';
import LanguageDropDown from './components/LanguageDropDown';
import LoadingDots from './components/LoadingDots';
import { ModelDropDown } from './components/ModelDropDown';
import Container from './components/Container';
const Home = () => {
const [idea, setIdea] = useState('');
const [tone, setTone] = useState('');
const [character, setCharacter] = useState('');
const [emoji, setEmoji] = useState('');
const [question, setQuestion] = useState('');
const [mood, setMood] = useState('');
const [language, setLanguage] = useState('');
const [loading, setLoading] = useState(false);
const [generatedTitles, setGeneratedTitles] = useState<string[] | null>(null);
const [selectedModel, setSelectedModel] = useState('gpt-3.5-turbo');
const [isDialogOpen, setIsDialogOpen] = useState(false);
const resultsRef = useRef<HTMLDivElement | null>(null);
const generateTitles = async (e: React.MouseEvent) => {
e.preventDefault();
setLoading(true);
setGeneratedTitles(null); // Reset generated Titles
const response = await fetch('/api/generate-titles', { // API route
method: 'POST',
headers: {
'Content-Type': 'application/json',
},
body: JSON.stringify({ idea, tone, character, emoji, question, mood, language, model: selectedModel }),
});
const data = await response.json();
setGeneratedTitles(data.generatedTitles);
setLoading(false);
};
const copyToClipboard = (text: string) => {
navigator.clipboard.writeText(text).then(() => {
setIsDialogOpen(true);
});
};
useEffect(() => {
if (loading && resultsRef.current) {
resultsRef.current.scrollIntoView({ behavior: 'smooth' });
}
}, [loading]);
function Pin(props: JSX.IntrinsicAttributes & React.AnchorHTMLAttributes<HTMLAnchorElement>) {
return (
<a
{...props}
target="_blank"
className="mr-0.5 ml-0.5 inline-flex items-center rounded border border-zinc-300 bg-white p-1 text-sm leading-4 text-zinc-800 no-underline dark:border-zinc-700 dark:bg-zinc-800 dark:text-zinc-100"
/>
);
}
return (
<main className="flex flex-1 w-full flex-col items-center justify-center text-center">
<Container>
<div className="shadow-sm font-semibold mb-4 first-letter:shadow inline-flex rounded-full px-4 py-1 md:py-2 text-xs md:text-sm leading-6 text-zinc-500 dark:text-zinc-400 hover:ring-gray-900/20 bg-white dark:bg-zinc-800 ring-1 ring-zinc-900/10 backdrop-blur dark:ring-white/20 dark:hover:ring-white/30">
Introducing TubeTitles.AI
</div>
<h1 className="text-balance md:text-6xl md:leading-[4.4rem] text-4xl font-bold text-zinc-900 dark:text-white tracking-tighter">
Your AI-Powered Solution For Generating Unique & Captivating{' '}
<span className="relative whitespace-nowrap text-red-500">
<svg
aria-hidden="true"
viewBox="0 0 418 42"
className="absolute left-0 top-2/3 h-[0.5em] w-full fill-red-300/70"
preserveAspectRatio="none"
>
<path d="M203.371.916c-26.013-2.078-76.686 1.963-124.73 9.946L67.3 12.749C35.421 18.062 18.2 21.766 6.004 25.934 1.244 27.561.828 27.778.874 28.61c.07 1.214.828 1.121 9.595-1.176 9.072-2.377 17.15-3.92 39.246-7.496C123.565 7.986 157.869 4.492 195.942 5.046c7.461.108 19.25 1.696 19.17 2.582-.107 1.183-7.874 4.31-25.75 10.366-21.992 7.45-35.43 12.534-36.701 13.884-2.173 2.308-.202 4.407 4.442 4.734 2.654.187 3.263.157 15.593-.78 35.401-2.686 57.944-3.488 88.365-3.143 46.327.526 75.721 2.23 130.788 7.584 19.787 1.924 20.814 1.98 24.557 1.332l.066-.011c1.201-.203 1.53-1.825.399-2.335-2.911-1.31-4.893-1.604-22.048-3.261-57.509-5.556-87.871-7.36-132.059-7.842-23.239-.254-33.617-.116-50.627.674-11.629.54-42.371 2.494-46.696 2.967-2.359.259 8.133-3.625 26.504-9.81 23.239-7.825 27.934-10.149 28.304-14.005.417-4.348-3.529-6-16.878-7.066Z" />
</svg>
<span className="relative font-extrabold">YouTube Titles</span>
</span>
</h1>
<p className="text-balance mt-8 text-center text-zinc-600 dark:text-zinc-300 md:text-lg">
This is a{' '}
<Pin href="https://nextjs.org">
<Image
alt="Next.js logomark"
src="/next-logo.svg"
className="!mr-1"
width="14"
height="14"
/>
Next.js
</Pin>
{' '}and{' '}
<Pin href="https://openai.com/">
<Image
alt="Open AI logomark"
src="/openai-logomark.svg"
className="!mr-1"
width="14"
height="14"
/>
Open AI
</Pin>
{' '}application that generates captivating YouTube titles. Just follow the 9 steps below to generate optimized, attention-grabbing titles to enhance your video's reach.
</p>
</Container>
<Container className='border-t my-6 border-zinc-400/20'>
<h2 className='mt-4 text-balance text-xl font-bold text-zinc-700 dark:text-zinc-200 tracking-tight'>Steps To Generate Titles:</h2>
<div className="mt-8 w-full">
<div className="flex mt-4 mb-5 items-center space-x-3">
<div className='bg-red-400 text-white rounded-full font-semibold items-center justify-center w-6 h-6'>1</div>
<p className="text-left font-medium tracking-tight text-zinc-700 dark:text-zinc-300">Choose AI Model:</p>
<ModelDropDown selectedModel={selectedModel} setSelectedModel={setSelectedModel} />
</div>
<div className="flex mt-4 items-center space-x-3">
<div className='bg-red-400 text-white rounded-full font-semibold items-center justify-center w-6 h-6'>2</div>
<p className="text-left font-medium tracking-tight text-zinc-700 dark:text-zinc-300">Enter Your Title Idea Below:</p>
</div>
<textarea
value={idea}
onChange={(e)=> setIdea(e.target.value)}
rows={2}
className="w-full px-4 py-2 rounded-lg border placeholder:text-zinc-300 placeholder:dark:text-zinc-500 dark:bg-zinc-800 border-zinc-300 dark:border-gray-700 shadow-sm focus:border-black focus:ring-black my-5 mb-6"
placeholder="ie: Becoming a software developer in 2024"
/>
<div className="grid sm:grid-cols-2 grid-cols-1 gap-4 text-center">
<div className="flex mb-5 items-center space-x-3">
<div className='bg-red-400 text-white rounded-full font-semibold items-center justify-center w-14'>3</div>
<p className="text-left font-medium w-full tracking-tight text-zinc-700 dark:text-zinc-300">Select Tone:</p>
<ToneDropDown tone={tone} setTone={(newTone)=> setTone(newTone)} />
</div>
<div className="flex mb-5 items-center space-x-3">
<div className='bg-red-400 text-white rounded-full font-semibold items-center justify-center w-14'>4</div>
<p className="text-left font-medium w-full tracking-tight text-zinc-700 dark:text-zinc-300">Character Limit:</p>
<CharacterDropDown character={character} setCharacter={(newCharacter)=> setCharacter(newCharacter)} />
</div>
<div className="flex mb-5 items-center space-x-3">
<div className='bg-red-400 text-white rounded-full font-semibold items-center justify-center w-14'>5</div>
<p className="text-left font-medium w-full tracking-tight text-zinc-700 dark:text-zinc-300">Add Emojis? 🚀</p>
<EmojiDropDown emoji={emoji} setEmoji={(newEmoji)=> setEmoji(newEmoji)} />
</div>
<div className="flex mb-5 items-center space-x-3">
<div className='bg-red-400 text-white rounded-full font-semibold items-center justify-center w-14'>6</div>
<p className="text-left font-medium w-full tracking-tight text-zinc-700 dark:text-zinc-300">Ask A Question?</p>
<QuestionDropDown question={question} setQuestion={(newQuestion)=> setQuestion(newQuestion)} />
</div>
<div className="flex mb-5 items-center space-x-3">
<div className='bg-red-400 text-white rounded-full font-semibold items-center justify-center w-14'>7</div>
<p className="text-left font-medium w-full tracking-tight text-zinc-700 dark:text-zinc-300">Select Mood:</p>
<MoodDropDown mood={mood} setMood={(newMood)=> setMood(newMood)} />
</div>
<div className="flex mb-5 items-center space-x-3">
<div className='bg-red-400 text-white rounded-full font-semibold items-center justify-center w-14'>8</div>
<p className="text-left font-medium w-full tracking-tight text-zinc-700 dark:text-zinc-300">Select Language:</p>
<LanguageDropDown language={language} setLanguage={(newLanguage)=> setLanguage(newLanguage)} />
</div>
</div>
<div className="flex mt-5 items-center space-x-3">
<div className='bg-red-400 text-white rounded-full font-semibold items-center justify-center w-6'>9</div>
<p className="text-left font-medium tracking-tight text-zinc-700 dark:text-zinc-300">Click generate button below:</p>
</div>
{!loading && (
<Button
className="rounded-xl font-medium px-4 py-3 sm:mt-10 mt-8 w-full bg-zinc-800 dark:bg-zinc-700 text-white shadow-inner shadow-white/10 focus:outline-none data-[hover]:bg-zinc-600 data-[open]:bg-zinc-700 data-[focus]:outline-1 data-[focus]:outline-white transition-all"
onClick={generateTitles}
>
Click To Generate YouTube Titles
</Button>
)}
{loading && (
<Button
className="rounded-xl font-medium px-4 py-3 sm:mt-10 mt-8 w-full bg-zinc-800 dark:bg-zinc-700 text-white shadow-inner shadow-white/10 focus:outline-none data-[hover]:bg-zinc-600 data-[open]:bg-zinc-700 data-[focus]:outline-1 data-[focus]:outline-white transition-all"
disabled
>
<LoadingDots color="white" style="large" />
</Button>
)}
</div>
<div className="mx-auto w-full space-y-10 my-10 mb-10" ref={resultsRef}>
{loading && (
<div role="status" className="mx-auto mt-20 mb-20 w-full p-6 space-y-10 border border-gray-200 divide-y divide-gray-200 rounded shadow animate-pulse dark:divide-gray-700 md:p-6 dark:border-gray-700 transition-all">
{[...Array(5)].map((_, index) => (
<div key={index} className="flex items-center justify-between pt-4">
<div className="flex-1">
<div className="h-2.5 bg-gray-300 rounded-full dark:bg-gray-600 w-24 mb-2.5"></div>
<div className="w-32 h-2 bg-gray-200 rounded-full dark:bg-gray-700"></div>
</div>
<div className="h-2.5 bg-gray-300 rounded-full dark:bg-gray-700 w-12"></div>
</div>
))}
<span className="sr-only">Loading...</span>
</div>
)}
{!loading && generatedTitles && (
<>
<div className='mt-10'>
<h2 className="sm:text-5xl text-3xl font-bold mx-auto tracking-tighter text-zinc-800 dark:text-white">
Your Generated Titles:
</h2>
<p className="mt-5">
<span className="text-zinc-500 dark:text-zinc-400">Click on any of them to copy them to your clipboard.</span>
</p>
</div>
<div className="space-y-10 flex flex-col items-center justify-center max-w-xl mx-auto">
{generatedTitles.map((title, index) => (
<div
key={index}
className="bg-white dark:bg-zinc-700 text-zinc-700 dark:text-zinc-300 rounded-lg p-4 shadow-md cursor-pointer"
onClick={()=> copyToClipboard(title)}
>
{title}
</div>
))}
</div>
</>
)}
</div>
</Container>
<Transition.Root show={isDialogOpen} as={Fragment}>
<Dialog as="div" className="relative z-10 focus:outline-none" onClose={()=> setIsDialogOpen(false)}>
<div className="fixed inset-0 bg-zinc-900 bg-opacity-75 transition-opacity" />
<div className="fixed inset-0 z-10 overflow-y-auto">
<div className="flex min-h-full items-center justify-center p-4">
<Dialog.Panel className="w-full max-w-md rounded-xl bg-white/5 p-6 backdrop-blur-2xl transition-all duration-300 ease-out data-[closed]:transform-[scale(95%)] data-[closed]:opacity-0">
<Dialog.Title as="h3" className="text-xl leading-6 font-semibold text-white">
Copied to clipboard!
</Dialog.Title>
<div className="mt-4">
<p className="text-sm text-zinc-400">
This insanely great YouTube title has been successfully copied to your clipboard. What a marvel of modern engineering.
</p>
</div>
<div className="mt-4">
<Button
className="inline-flex items-center gap-2 rounded-md bg-gray-700 py-1.5 px-3 text-sm font-semibold text-white shadow-inner shadow-white/10 focus:outline-none data-[hover]:bg-gray-600 data-[focus]:outline-1 data-[focus]:outline-white data-[open]:bg-gray-700"
onClick={()=> setIsDialogOpen(false)}
>
OK
</Button>
</div>
</Dialog.Panel>
</div>
</div>
</Dialog>
</Transition.Root>
</main>
);
};
export default Home;Credit Where Credit Is Due:
I took design inspiration and ideas from these websites and templates. Kudos to the talented developers for their great work:
- Lee Robinson's Portfolio Website
- Hassan El Mghari's TwitterBio.io
- Apple Store Website
Conclusion:
So, we built a practical, AI-powered tool using modern web stacks. By combining Next.js, TypeScript, and Tailwind CSS with OpenAI’s language models, we created an application that generates engaging YouTube titles based on user inputs. Honestly, I can see this being adapted for just about anything.
Hope that helps! Please star on GitHub if you found this helpful! Cheers! 😁
https://github.com/JPerez00/ai-youtube-title-generator