

Resend Contact Form Template
A Simple Next.js, TypeScript & Tailwind CSS contact form template that uses the Resend API. Styled with React-Email and built with React-Hook-Forms, validated with Zod, handles submissions with server actions, and shows toast notifications using Sonner.
Live Demo:
https://resend-email-template.vercel.app/
Main Features:
- Resend Email API
- Form built with React-Hook-Forms
- Styled with React-Email
- Email validation With Zod
- Dialog Toast Notification With Sonner
Prerequisites:
This template requires a Resend API key and a verified domain name. Follow the instructions below to set this up:
Clone & Run Locally
First, execute create-next-app with npx to bootstrap the example:
npx create-next-app --example https://github.com/JPerez00/resend-email-template your-project-name-here
Create a .env.local file in the root directory of your project and add your Resend API key and emails:
RESEND_API_KEY=your_resend_api_key_here
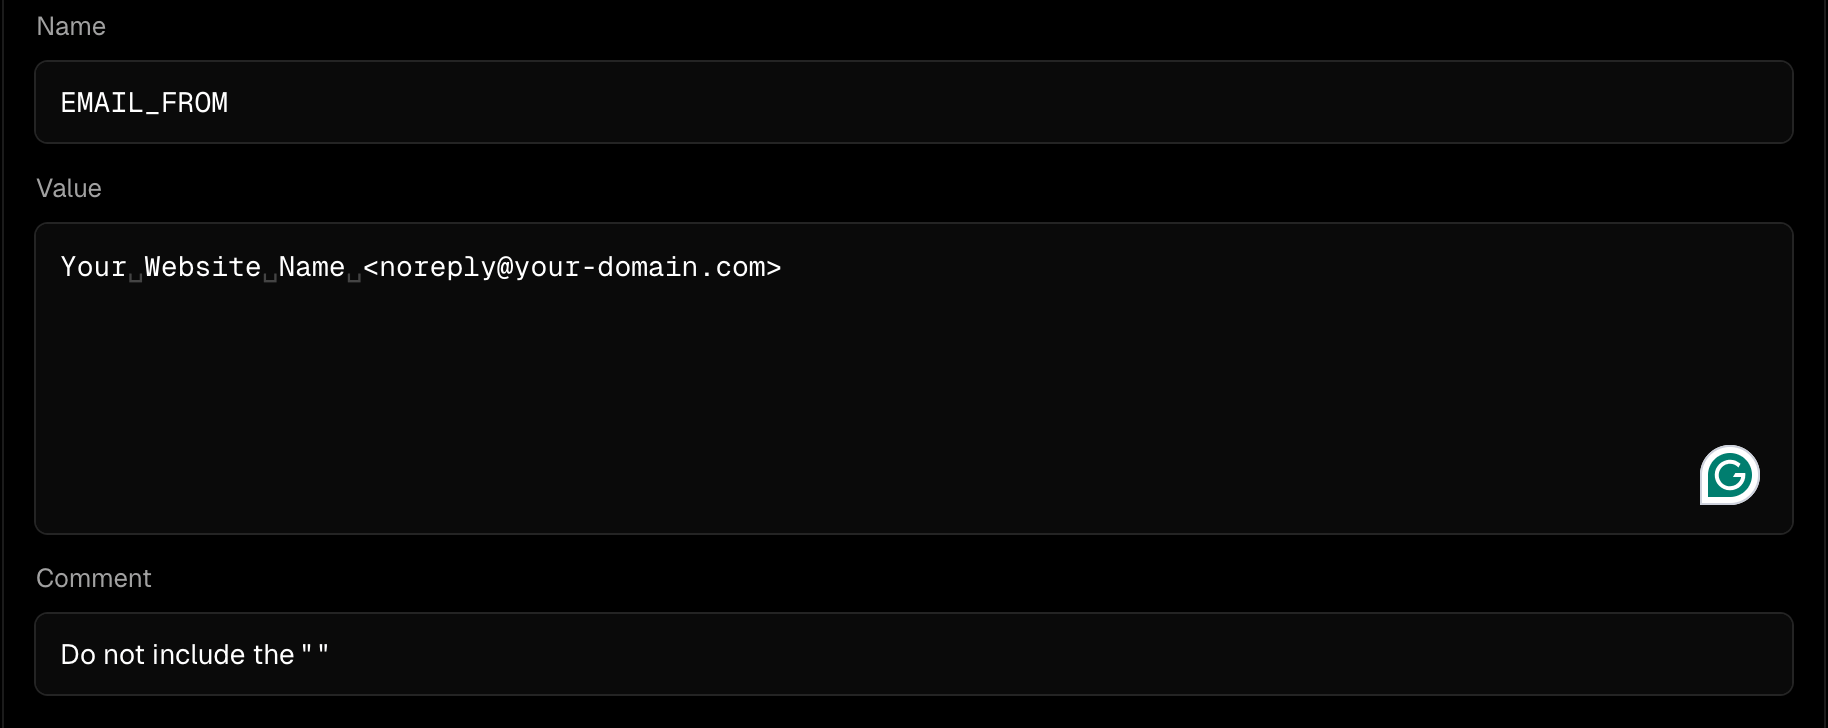
EMAIL_FROM="Your Website Name <noreply@your-domain.com>"
EMAIL_TO=your_destination_email@example.com
Then run the development server:
npm run devClone & Deploy
When deploying the project to Vercel, add the same environment variable to your Vercel project.
Navigate to your Vercel dashboard, select your project, go to the "Settings" tab, and then to "Environment Variables." This ensures the API key is securely accessible both locally and in the deployed environment.
RESEND_API_KEY=your_resend_api_key_here
EMAIL_FROM=Your Website Name <noreply@your-domain.com>
EMAIL_TO=your_destination_email@example.com
Important Note:
Include quotes around the value in the .env.local file, but omit them in the Vercel Environment Variables. For example:
- Locally:
EMAIL_FROM="Coding SaaS <noreply@codingsaas.com>" - On Vercel:
EMAIL_FROM=Coding SaaS <noreply@codingsaas.com>
See Vercel deployment example below:
Start Editing
To set up your emails, just add your Resend API key, a verified domain name, and your source and destination emails:
Previously, you had to manually edit the from and to addresses in the app/actions.ts file, like this:
// Make sure it matches the registered domain on Resend.com
from: 'Your Website Name <noreply@your-domain.com>',
// Your desired destination email here.
to: ['your@email.com'],
Now, you can simply update these in your .env.local file or Vercel Variables when deploying. Your app/actions.ts file will now use:
from: process.env.EMAIL_FROM as string, // Fetch "from" email from environment variables
to: [process.env.EMAIL_TO as string],    // Fetch "to" email from environment variables
Steps To Create This Project:
1. Project Initialization:
Create a Next.js 14 project with TypeScript and Tailwind CSS.
npx create-next-app@latest resend-email-template --ts --tailwind
cd resend-email-template
2. Installing dependencies:
npm install resend react-email react-hook-form zod sonner @hookform/resolvers3. Create The Contact Form Component:
Created with react-hook-forms, this contact form is imported on the main page.tsx file for this demo, but you could import it inside an actual contact page, ie: “app/contact/page.tsx”.
// app/components/ContactForm.tsx
'use client'

import { useForm } from 'react-hook-form'
import { zodResolver } from '@hookform/resolvers/zod'
import { z } from 'zod'
import { ContactFormSchema } from '../../lib/schema'
import { sendEmail } from '../actions'
import { toast } from 'sonner'

export type ContactFormInputs = z.infer<typeof ContactFormSchema>

export default function ContactForm() {
  const {
    register,
    handleSubmit,
    reset,
    formState: { errors, isSubmitting }
  } = useForm<ContactFormInputs>({
    resolver: zodResolver(ContactFormSchema)
  })

  const onSubmit = async (data: ContactFormInputs) => {
    const result = await sendEmail(data)

    if (result?.success) {
      toast.success('Email sent!')
      reset()
    } else {
      toast.error('Something went wrong!')
      console.error(result?.error)
    }
  }

  return (
    <form
      onSubmit={handleSubmit(onSubmit)}
      className='mx-auto flex flex-1 flex-col max-w-2xl px-2'
    >
      <div className="space-y-6">
        <div className="space-y-2">
          <label htmlFor="name" className="text-zinc-200 font-medium">Name:</label>
          <input
            {...register('name')}
            placeholder="John Snow"
            className='w-full rounded-lg px-3 py-2 mt-2 border border-zinc-600 hover:border-zinc-500 placeholder:text-zinc-600 bg-zinc-900'
          />
          {errors.name?.message && (
            <p className='ml-1 mt-1 text-sm text-red-400'>
              {errors.name.message}
            </p>
          )}
        </div>
        <div className="space-y-2">
          <label htmlFor="email" className="text-zinc-100 font-medium">Email:</label>
          <input
            id="email"
            placeholder="john@thenorth.com"
            type="email"
            className='w-full rounded-lg px-3 py-2 mt-2 border border-zinc-600 hover:border-zinc-500 placeholder:text-zinc-600 bg-zinc-900'
            {...register('email')}
          />
          {errors.email?.message && (
            <p className='ml-1 mt-1 text-sm text-red-400'>
              {errors.email.message}
            </p>
          )}
        </div>
        <div className="space-y-2">
          <label htmlFor="message" className="text-zinc-100 font-medium">Message:</label>
          <textarea
            className="min-h-[100px] mx-auto w-full rounded-lg px-3 py-2 mt-2 border border-zinc-600 hover:border-zinc-500 placeholder:text-zinc-600 bg-zinc-900"
            id="message"
            placeholder="I know nothing..."
            {...register('message')}
          />
          {errors.message?.message && (
            <p className='ml-1 text-sm text-red-400'>{errors.message.message}</p>
          )}
        </div>
        <button
          disabled={isSubmitting}
          className="mt-2 inline-flex items-center rounded-lg bg-zinc-700 py-2 px-4 text-sm/6 font-semibold text-zinc-100 shadow-inner shadow-white/10 focus:outline-none hover:bg-zinc-600 focus:bg-zinc-700 focus:outline-1 focus:outline-white"
        >
          {isSubmitting ? 'Submitting...' : 'Submit'}
        </button>
      </div>
    </form>
  )
}
4. Create the Server Action File:
The form uses the 'app/actions.ts' file for sending the actual email, basically a server action with from and to emails easily accessible from the .env.local file.
// app/actions.ts
'use server'

import { z } from 'zod'
import { Resend } from 'resend'
import { ContactFormSchema } from '../lib/schema'
import ContactFormEmail from '../app/emails/ContactFormEmail'

type ContactFormInputs = z.infer<typeof ContactFormSchema>
const resend = new Resend(process.env.RESEND_API_KEY) // Fetch Resend API from environment variables

export async function sendEmail(data: ContactFormInputs) {
    const result = ContactFormSchema.safeParse(data)

    if (!result.success) {
        return { success: false, error: result.error.format() }
    }

    const { name, email, message } = result.data

    try {
        const emailData = await resend.emails.send({
            from: process.env.EMAIL_FROM as string, // Fetch "from" email from environment variables
            to: [process.env.EMAIL_TO as string],    // Fetch "to" email from environment variables
            subject: 'Contact Form Submission',
            text: `Name: ${name}\nEmail: ${email}\nMessage: ${message}`,
            react: ContactFormEmail({ name, email, message })
        })
        return { success: true, data: emailData }
    } catch (error) {
        return { success: false, error }
    }
}
5. Create An Email Template:
This is one of the email templates from 'react-email', more examples or email templates can be found here.
Create the 'app/emails' directory and then create the email template inside it. This is a good way to have multiple templates and just switch them on a whim if needed.
// app/emails/ContactFormEmail.tsx
import { ContactFormInputs } from '../components/ContactForm';

export default function ContactFormEmail({ name, email, message }: ContactFormInputs) {
  return (
    <div>
      <p><strong>Name:</strong> {name}</p>
      <p><strong>Email:</strong> {email}</p>
      <p><strong>Message:</strong> {message}</p>
    </div>
  );
}
6. Create The Validation Schema:
The form also uses the lib/schema.ts file which is the ZOD resolver schema to define the shape of the data coming in from the form, ie: name, email, etc.
// lib/schema.ts
import { z } from 'zod'

export const FormDataSchema = z.object({
    name: z.string().nonempty('Name is required.'),
    message: z
        .string()
        .nonempty('Message is required.')
        .min(6, { message: 'Message must be at least 6 characters.' })
})

export const ContactFormSchema = z.object({
    name: z.string().nonempty('Name is required.'),
    email: z.string().nonempty('Email is required.').email('Invalid email.'),
    message: z
        .string()
        .nonempty('Message is required.')
        .min(6, { message: 'Message must be at least 6 characters.' })
})
7. Toast Notification With Sonner:
Sonner is a fun, lightweight toast component. Here we just add it our app, either on a providers.tsx file or in the root of your app.
// app/Providers.tsx
'use client'
import { Toaster } from 'sonner'

export default function Providers({ children }: { children: React.ReactNode }) {
  return (
    <>
      {children}
      <Toaster position='top-right' richColors expand closeButton />
    </>
  )
}
I chose the 'top-right' position, and the 'Rich Colors Success' styling, but there are multiple options to choose from, check them out here.
If you're using a 'providers.tsx' file like I am, then don't forget to wrap your 'layout.tsx' file with it:
// app/layout.tsx
import Providers from "../app/Providers"; // Or where you added <Toaster>

return (
    <html lang='en'>
      <body className={inter.className}>
        <Providers>{children}</Providers>
      </body>
    </html>
  )
Credit Where Credit Is Due:
I took design inspiration and ideas from these websites and templates. Kudos to the talented developers for their great work:
- Hamed Bahram's YouTube Video
- Resend Documentation
Conclusion:
Okay, so we built a functional contact form that uses the Resend API, and with the help of react-email, we can style it or add any templates that suits the application that you want to build!
Hope that helps! Please star on GitHub if you found this helpful! Cheers! 😁
https://github.com/JPerez00/resend-email-template